I added a sleeve, hand sewn from left over material I used to make my clown pants and floral skirt so that this alter would carry a little bit of me - bright and tropical color choices to remind us of the more cheerful side of life. To read more about how I created the tea cup holding arm, please click on over to my blog: http://calmundertension.com/blog.html
*Wild Hair [wahyld hair] noun* An idea or inspiration that leads Peg to create in a plethora of materials while dancing to her own soul's song.
Showing posts with label full moon. Show all posts
Wednesday, July 20, 2016
Summer of Dragons
The last few nights as dusk fell I had given up my plan to gaze at the ripening July moon. Cloudy days followed by even thicker cloudy evenings had been the norm the previous week. Tonight was the full moon, I had taken the time to meditate and journey in the summer house on this full moon night and imagine seeing Grandmother Moon in her full glory on a clear star filled sky.
I found images of flying dragons slipping in my journey, gliding by outlined by moon light then completely blocking out the light leaving only the gleam of fire in their eyes before seeing the moon appear again.
I finished my ritual, glanced at the darkening sky and was rewarded to see a bit if blue and gold as sunset began. Maybe just maybe I would be able to see the moon tonight.
Returning to the house, my potted garden plants cried for watering, cats required cuddling and days end chores began.
The dusk gathered thickly and so did our clouds, perhaps tomorrow I thought.
Time for bed and I did not give the moon another thought until I started to close the curtains before turning on the lamp beside my bed. I looked out the windows into the night sky between the cedars to see if there was even a glow in the cloud cover.
To my amazement the clouds had formed a very distinct dragon profile with an eye shape and a a half circle of the moon formed the eyeball. There was also a rainbow at the top of the dragon head.
I closed my eyes , rubbed them, looked again. It was still there. I walked into the next room and looked out that window in case I was seeing a smudged spot in the window glass. No same view...so I brought in the big guy to check it out. He saw the dragon eye as well. Yippee I was delighted. Went back to the first window to see the clouds slowly cover her beautiful light as if to say good night.
Moonlight and dragons forever in my Summer full moon memories.
Peg 7/19/16
Sunday, January 19, 2014
January Full Moon # 8
Hello dear readers and fellow artists!
For the final full moon exchange I had myself. Every time I looked at the two spaces all I could see was a little creature sitting & gazing at the stars or swinging or doing something, but always sitting between the two spaces as though it was one complete space. So as I've learned, rather than fight the visions that you're seeing, trust them and go with them.
I've learned the best place to start, if your piece will involve sculpting, is to begin with the sculpture itself. The rest of the details will take care of themselves once the sculpture is done.
So I found the color liked. Blue seemed to suit the thoughtful posing I saw the character in. I curled his toes and helped him sit gently on the ledge. The drippiness of this particular clay lent to him naturally turning his head as though he were listening to something.
I tried out a few backgrounds to see how I'd like them. Then I sat back in my chair across the room to see what that gave as an effect to the whole tray as well as just that little area where he would be. Unfortunately this first set of the backgrounds just didn't quite do the trick.
But he needed a little something more... He just felt so bare. And he was beginning to feel more like he was part of the stars, like a little being that had come down from the stars. So I gave him a crown of stars made from some star shaped sequins.
After basking in the warm glow of the oven I gave him a little paint. I thought having a background with lines as well as stars would be fun, having lines looking more like astrological symbols and charts. So I used up a piece that I had already folded into a box (marked with sharp lines) and fit it into the new spot's shape. The background is actually made from colored pencil and is very similar to the one I made for the pink moon several moon exchanges back.
Meet my star being. He watches over and listens. He is ready to offer any advice you might need. He encourages us to gaze upon the stars and listen for the answer.
Thank you all for a lovely experience. I have learned a great deal and enjoy getting artwork from each and everyone of you. I feel like I've made large strides as an artist. It's because of the project that I feel confident in my sculpting skills again. Thank you Peg!! Tuesday, May 28, 2013
MAY PINK FLOWER MILK MOON #6
Hi Kathy & AlterMooners. :) This is Gwen.
This month I created a hand using techniques I learned in a class taught by Deb Wood on A for Artistic, "Sculpting Feminine Hands and arms".
I added a sleeve, hand sewn from left over material I used to make my clown pants and floral skirt so that this alter would carry a little bit of me - bright and tropical color choices to remind us of the more cheerful side of life. To read more about how I created the tea cup holding arm, please click on over to my blog: http://calmundertension.com/blog.html
MAY FLOWER MILK PINK MOON#3
My blurb:
The old saying April showers bring May flowers kept running through my head while creating this month's altar installation for Lynn V. I tried something different using faux flowers along with polymer clay. Hyacinths, one of my favorites, they never last long enough. As summer is on the horizon with hopes of sunshine and warmth bringing with it more flowers, veggies baby birds and critters....oh it's a wonderful time of year!! Cheers, Cyn
MAY PINK FLOWER MILK MOON #2
Here is my picture for Kimberly's piece. I enjoy making
wearable art, and I seem to be on a pin thing! You know, useful art;
something that does not just sit on a shelf collecting dust, but can be used.
Many times they speak to me while I am making them, and this one did.
It is called Moon Dancer. Made with a glass schard, wire and some
of my beads. I take the glass schard and paint it with permanent paint,
inks and such. Hope she make you smile Kimberly!
Blessings, Marilynn
Blessings, Marilynn
Hi Peg,
Attached files above
are from the Little Alters project I received from Marilyn Dondero-Rich.
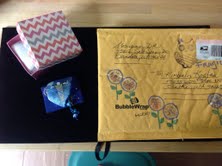
Received my package
from Marilyn DR and it was so cutely decorated with an Owl stamp &
flowers from shinny pens! The festively decorated package
added to the excitement. Once opened I held a cute little box with
the precious piece inside. And then, oh my, what a beautiful
Goddess of the Moon painted on frosted blue glass with delicate little beads
hanging from it. It's a pin nestled on decorated backing that has the
artist's signature on it. Way cool, I just love it as my newest addition
to my Little Alters Box.
Sunday, April 28, 2013
SEED MOON #6
For several months I’ve been inspired to use these little paper
flowers. I believe they are mulberry paper, and not the kind of thing
that I usually find in my travels or surround myself with. I bought them
several years ago, and re-discovered them in a drawer. (I find it very
happy and convenient to find serious inspiration by rummaging through my own
drawers!)
This month’s spot was the perfect opportunity to stack several
of these, stitch them together, and top them with a handmade bead whose origin
I’ve forgotten. And to be honest, one of the best things about my project
this month was that it took very little time, and was not an experimental
struggle! I’m going to miss my little blossom. I hope it’s snug as
a bug with Marilyn!
Nancy Strahle
SEED MOON #4
The full moon is here!! And it arrived early as far as I
can tell! I have been entrenched in making jewelry for the Camano Arts
Studio Tour and have hardly come up for air. You are all invited to come
up! The information can be found through my websitewww.kathydannerbeck.com or
through the Camano Arts Association website atwww.camanoarts.org .
I would love to see you!!
The project for this month has been in the works for a
while. I too did research and found that this is the month for planting,
seeds and all the good things that Peg told us about. And this full moon
is also called the pink moon. So in trying to do something that fit with
the moon names and knowing that Beth loves gardening and plants....I came up
with “Strawberry Fields Forever!”
The strawberries are sort of pinkish/red, they have seeds on
them, and Beth loves gardening! The slight little snafu is that all the
berries didn’t ripen yet so there is only one in the spot now....but with more
to come!
The berry is felted and then bead embroidered! Fun to
make!! If only we could eat it too!
SEED MOON #3
Hi Peg, here's a little picture I made for the April 'Little
Alters' project. This one is going to Kimberly.
When I received the sweet packet you sent recently with the
seeds enclosed I was instantly inspired. You mentioned that this month's moon
is known by two names: the Pink Moon and the Seed Moon.
I then thought I'd make a picture of a newly planted seed as it
progressed from germination to full bloom. Love, Lou
SEED MOON 2
Happy SEED MOON!
I love the smell of fresh cut grass and new bark (lumber
too!). I love spring, sunshine, flowers, and the promise of warm days to
come. I plant new things every year and watch them grow. I quite
literally check things almost every day to see even the most miniscule fraction
of growth. My husband laughs at me when I make him look at the tiniest
first tomato that is barely the size of a 1mm pearl.
I recently used Polymer clay for the first time and decided to
try something again this month. Somehow, I couldn’t keep my flowers small
enough, they wanted to be big and be worn instead of hiding inside their little
shadow box all of the time so I had to design my box to “hold” two small
flowers that could be easily removed.
I wanted fresh grass, blue skies, and a puffy cloud. The
cloud, seemingly ever present here in April (and most of the rest of the year),
is the reason we have so much green and so many beautiful flowers and
trees. I used a two-step process for making my lawn. I cut tiny
little pieces of grass from my clay and baked them. Then I hand planted
each individual blade, approximately 50, with tiny tweezers and then baked
again to complete the process. Cut to shape and it sits neatly in front
of my hand painted sky with glittery cloud. This grassy foreground then
acts as a stand to keep my flowers standing up. Tucked behind each flower
is a sterling silver earring wire so they can be picked from their perch in the
grass and worn. They seemed lonely to me and I wanted a pendant to
match. Wouldn’t fit in the box so it is just a little added bonus.
The flowers were made with Polymer clay and just before baking I hand painted
the leaves with powdered pigments to add a pearlescent shine.
To install in the box, just glue the back piece “sky” down,
slide the grass in, and then place the earrings behind in the grass with their
ear wires hidden behind. Keep your necklace on hand and wear when the
mood blooms in your heart.
I hope that Gwen likes my little altar installation and that the
color of the flowers are something that will compliment her wardrobe on
occasion.
Best wishes to all,
Lynn
SEED MOON 1
It's alter time again!!
This month's full moon is known as the seed moon or pink moon. For some reason, I've been struck by the glory of a moon dressed all in pink. See it gets the name pink from the ground phlox that blooms this time of year. And this is one of my absolute favorite times of year to photograph. I love gardens in spring. I grew up playing among the azaleas, Andromeda, bluebells and daffodils.
I love the way the earth smells when she's laughing in flowers. Persephone does leave a glorious and fragrant wake as she returns from Hades. There is nothing like the delicious smell of blooming azaleas, Andromeda and clematis all mingling with rhododendron an the warmth of a sunny spring day or lingering upon every dew drop following a gentle spring rain.
The images you see before you are a several photographs I took in one of my favorite gardens. If you play in the garden, you'll find magic & faeries among the bright blossoms & rich evergreens or deep underneath the cascading blossoms of the Andromeda bush.
What I find fascinating is how different the scents are from each of these flowers. The clematis really smell like chocolate. The andromeda like a heavy, syrupy honey, and the azaleas are sweet and bright, like a sibling to the summer trumpet vine or the springtime honeysuckle found enveloping every early spring night in Kansas City, Missouri as the days heat wanes and the earth sleeps. I would love to travel the world as spring comes alive in every place just to experience the scents. What would it be like to be right smack in the desert when all those cactai burst open? Or how about standing in a Moroccan garden among the roses? Or sipping your morning espresso beneath an arbor crafted of gardenia? It'd be quite a glorious hedge. What other amazing scents could you discover? If only to bottle these and wear them. I would definitely wear scents of Azalea, Andromeda, or Honeysuckle.
Wow, glancing over this post, I love how colorful it is. And, I realized how truely me it is! I love it! Color is a wonderful thing. I lived in a land of grey once and now choose to live in technicolor how ever I possibly can.
Back to the moon. When I began sculpting, I didn't intend her for the Alter project. After last month, I decided I'd just play a little and if it worked out, great. If not, then I'd have a fun art piece and I would have taught myself to sculpt a face in paper clay. I've done quite a bit of sculpting with pottery clay, sculpey and fimo, but paper clay seemed too soft. With inspiration and courage found from classes with Michael DeMeng, Clarissa Callisen, Patricia Hedegaard and the Halloween book by Mr. Glitterville, I embarked upon the journey.
Well, it was a bit soft. But, I just kept playing and out came this magical moon face. Then, instead of keeping her just a full moon, I decided that I wanted her to represent both the full and the crescent moon. She could be waxing or waning, depending on which side you observe her. I gave her a long pointy nose and a very pointy up-tipped chin. I tried the pressed in eyes like shown in Glitterville, except with mine, I added them with flattened circles of of clay and created eye sockets, just in case I wanted to add a glass eye.
Then, after bone dry, I began painting. Thank God I'd been through Michael DeMeng's classes where I learned his layering techniques to achieve the most amazing painted surfaces. It was not easy to grasp how many layers go into a surface to achieve depth. And, might I add the patience one really needs to have. I do like the look, but often avoid it because I run out of patience. Well, fortunately, I happened to find an extra dosage bottle of art patience in my medicine cabinet. For this moon alone, I believe there are ~ 7 layers just for the main color. Then, there are many more layers in the eyes, lips, etc. The nice part about layers is if you don't like the look, paint over and start again. There are actually green, blue, purple, pink, and many other colors in there. The more I painted her, the more she felt like an Italian clown, part of the Pagliacci or even a marionette. I think my style is beginning to emerge. How lovely!
I couldn't let the moon go up without a rich and colorful night sky behind her. While resting from a minor injury, I picked up my colored pencils. Had such great fun with them on the shrinky-dinks, but haven't found the look I want on paper. I really like a layered, depth, but didn't know how to create it. So, off I went in search of tutorials from the great world of bloggers. Not many, but I found one that showed putting red behind blue and blue behind red. Huh. It looked weird on it's own, but I figured it would be interesting to try in my favorite colors - pink and aqua.
I started playing with the colors at hand. I was tickled to see the rich sky colors I could create. Just like so many nights I've tried to photograph, but my camera just won't pick-up. Oh glory me, this is really exciting. Now, I have a way to create night skies. I've been dreaming of this. And, all because I sculpted this moon, and just played really, do I know a new way to make a magical scene. LUCKY ME!
Subscribe to:
Posts (Atom)